
Cardboard House Project (Dramatic Play)
This project will require some dedicated space in your classroom and a bit of prep, but it will be one of the more memorable activities you’ll ever do. To begin with you’re going to need several large appliance-size boxes–the kinds that are big enough for a few of the kids to stand in. These are going to become the different rooms of your house–you’re going to set them next to one another and glue them together like modular units to create a multi-room house. So stop by furniture and appliance stores and ask if they have any large boxes to donate. It doesn’t matter if they’re all the same size or not. You can start off with one or two and then continually add onto your house as more become available.
Set the box(es) out in an open area of the classroom, and start constructing your house. Use an exacto knife or serrated steak knife to create doors and windows, like so:
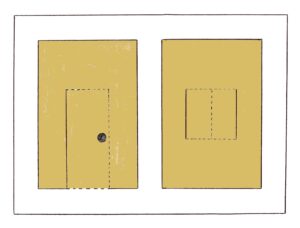
- Mark and cut out a front door, cutting along 3 sides of a rectangle and then bending and creasing the remaining side of the rectangle so that it opens and closes like doors on a hinge (see the diagram above). Cut out a hand hole or attach a handle to open and close it.
- Cut out windows. You can cut the square out completely or cut it in a shutter pattern so that they open and close (see the diagram above).
- Create internal doors by cutting passageways from one box to another.
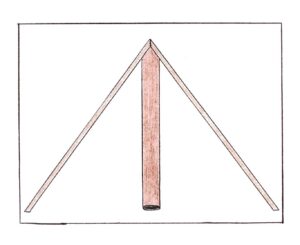
- Create a roof by angling cardboard panels and using wallpaper tubes with one edge cut at an angle for support beams (see diagram below).
Next, it’s all about decorating your new play home. With teacher assistance, have your kids…
- Paint the exterior (be sure to use washable school paint and lay down plastic bags or sheeting underneath to protect your floors).
- Paint or apply wallpaper to the insides of the boxes.
- Create a mirror inside using reflective contact paper or a plastic sheet mirror.
- Make paper flowers and pretend potters to set outside.
- Lay down tile, linoleum or carpet pieces on the floor.
- Make cardboard picture frames and find pictures from magazines to put inside. Then paste them onto interior walls.
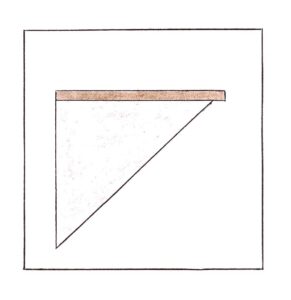
Make small plastic shelves by cutting 3 inch by 12-18 inch pieces of cardboard panels and then cutting 4-5 triangle-shape support pieces from a cardboard box to glue underneath it, like so:
Continue to tweak and work on your house while allowing children to play in it. The hardest part of this activity will be convincing the kids to let you take it down.