
This theme explores Butterfly’s, Bumblebee’s, Caterpillars, Worms, Ladybugs, Spiders, Flies and all sorts of other creepy crawlies. I’m getting the jitters just thinking about it.
Ants On A Log (Snack)
Kids of all ages
This is a healthy and tasty treat that is simple to make. Just cut up celery sticks, provide the kids with peanut butter, spoons, and a bowl of raisins. (Double check for peanut allergies.) Have the children cover their piece of celery in peanut butter, then add raisins to the top for ants on a log.
Bug Splatter Prints (Art Activity)
Kids of all Ages
Provide the kids with construction paper in a variety of colors, and get out colored tempera school paint. Squeeze a little bit of paint onto their paper, then have them fold it over and rub the paper back and forth . (with younger kids, you might want to pre-fold the papers to make it easier.) When they open the paper up again, the paint will have made a unique design. Add another color of paint in a different area of the paper, and repeat the process until the kids want to leave the design as it is. When done, you will have a variety of bug-like prints. This is a fun activity, and most kids will want to do several different pictures, so be prepared with lots of paper and paint.
Coin Caterpillars (Art / Math)
Preschool & Kindergarten
Gather a whole bunch of pennies. Set them out at the table along with glue, construction paper, and colored markers. Have kids glue their coins on the paper in a row to create a caterpillar, then use markers to draw legs, antennae, and a background for their caterpillar. Work in counting concepts as they create their artwork.
My Own Worm Farm (Science)
All Ages
Collect enough plastic Gatorade bottles or other similar containers for each child in your class. Clean each one and peel off the label. (Soda bottles will also work in a pinch, but preferably you want something with a wider lid.) Use a power drill to drill 4-8 small air holes in the lid of each bottle. Dig up some dirt from outside and put it in a tub, or get a bag of top soil from a landscaping store. Also get a tub or two of earthworms from a local fishing supply or sporting goods store, enough for each child to have 2-3 worms.
Have kids spoon dirt into their bottles, filling it nearly to the top, leaving an inch or so of open space near the top of the bottle. Then let them pick out some worms to add to their bottle. Secure the lid and they’ll have a portable worm farm to take home. Have them feed their worms by adding scraps of fruit or potatoes to the top of the bottle. Be sure to place it in a spot away from the sun, or you’ll end up baking the worms inside.
For a few weeks have them observe the worms in the bottle and record what they do or take notes on their behavior. Then have kids dig a shallow hole somewhere outside and set them free, re-depositing them in the earth.
Paper Plate Ladybugs (Art)
All Ages
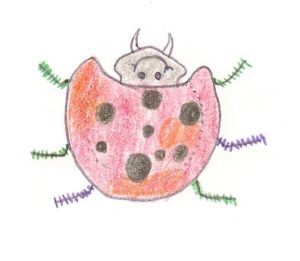
Using a non-laminated paper plate, draw a semi-circle around two-thirds of the way up, as if cookie monster had taken a bite out of it. Now in that indented area, draw a triangular-shaped head. (See attached picture) Then cut out the area around the head, and use this as a stencil to create one such outline for every child in your class.
Have kids turn their plate upside down and paint the largest part of the plate in red and orange colors, then paint the head area black or gray, adding a face if they’d like with other colors. Next set out scraps of black construction paper, and have them cut circles from the construction paper to glue on as the ladybug’s dots. (Or if you’d prefer, just have them paint the dots on with the black paint.) Set the projects aside to dry.
Once they are dry, cut some pipe cleaners into 2 inch sections. Have kids poke 3 pieces of pipe cleaners through each side of the plate to make the legs. Finally, have them cut a couple pincher shapes for the mandibles (see attached picture) and glue them to the front of the head. These ladybugs may not be anatomically correct, but your kids will enjoy both the process and the finished product!
Fuzzy Caterpillars (Art)
Preschool-Grade 3
Dye cotton balls ahead of time into an assortment of colors and allow them to dry. Use a small dixie cup to trace circles on construction paper. Have children cut the circles out and then glue them onto a sheet of white paper in a chain like the links of a caterpillar. (A piece of butcher paper that is wider than it is tall works best, so that kids have plenty of length to glue their caterpillar on.) Have them draw a face on the front circle and legs underneath the rest of the body, as well as color the background. Then glue the cotton balls onto the body of the caterpillar to complete their artwork.